Showing posts with label crafts. Show all posts

Thursday, April 17, 2014

How to make an Easter treat bag

Do you have lots of batting scraps left over from your quilting projects and don't want to throw them away, yet don't know what to do with them?


While looking through the many Easter projects posted on Pinterest, I saw this cute bunny bag made of felt.

Bunny Bag by Merrilee - @mer-mag on Instagram


Immediately I thought of all the scraps I have of Quilters Dream Fusion Natural Cotton Select and decided to give it a try.


Dream Fusion is my favorite batting because I tend to do small projects, including quilts, on my domestic Singer sewing machine.


The Dream Fusion allows me to secure the batting to my backing material and simply pin the four corners of my quilting projects and quilt away without having to worry about any pleating or puckering of my backing. You do not need to spray baste or thread baste your quilt top to your batting/backing material once the Dream Fusion is secured to your backing material.  [If you like paper piecing, Dream Fusion is wonderful for securing the seams of your finished pieced quilt top!]

For this project I found a sweet spring print and fused the batting and cotton fabric.  The fabric will actually be the inside of the bag and the batting will be the outside of the bag.  [If you have scraps of the Quilters Dream Cotton Select, Deluxe or Supreme loft you can make these bags without of fabric lining!]


To fuse - use the Cotton STEAM setting on your iron, place the Dream Fusion on the ironing board with the fusible side up and then place your fabric right side up on top of the batting.  Steam is your friend.  Take your time and slowly iron the two pieces together.  Once your piece cools the Dream Fusion is secure to the fabric.  


Next - make your template.


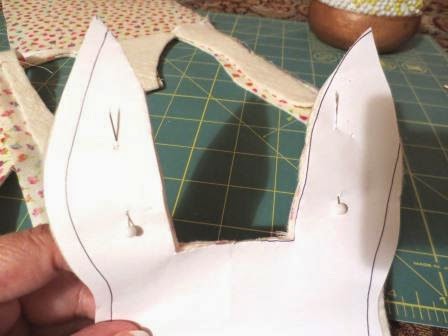
I took a half of a sheet of regular typing paper and freehand the outline of the face of a bunny.  Yes, the first time I drew the outline I realized the space between the bunny ears (which will not be sewn) was not going to be wide enough to place any candy in the bag when finished, thus the additional lines.


To ensure both sides were equal, I folded the paper in half and cut.  I did remember to cut a 1/4" seam allowance around the the outline for sewing purposes.


When I opened up the paper template it looked much better.


Because I had a long, narrow piece of fused batting I decided to fold it in half and save myself from having to sew a bottom seam.  


I placed the bottom of the paper template to the folded edge of the batting, pinned the template in place and cut.

Looks good, except I wanted it a little wider at the opening between the ears.  


No problem - just trim the template and batting from the inside of the two ears.


Much better!
Remove the pins and paper template and open up your fused fabric piece.  


Take a piece of your scrap fused fabric and cut out a triangle.  With a zigzag or decorative stitch sew the triangle piece of fabric on the batting side as a nose for your bunny's face.  You will also want to stitch a solid line about 3/4" of an inch from the bottom point of the nose to act as the mouth.  If your machine has a decorative stitch that looks like a filled in circle, use that to sew two eyes just above the fabric nose or add buttons for eyes.
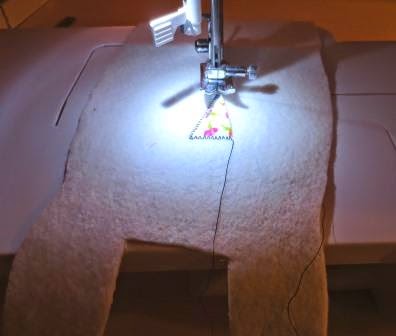

You are almost done!  Fold the piece in half with the batting facing right sides together.  This will mean your fabric is on the outside.


Start at the inside edge of one of the bunny ears and sew all the way around the template.  You will want to back stitch your first few stitches and your last few stitched to secure your sewing.  While I had folded the fabric at the bottom and didn't need to stitch, I was on a roll and just kept sewing until I reached the inside edge of the second ear.


You will leave the space between the ears open.  Now, turn the bunny bag right side or batting side out.


Give the bag one more good steam press with the iron.


Fill with candy.


Take a strip of your fabric or some ribbon and tie a bow at the top and voila!  A fun Easter gift to share with others.


I made two, one for our sweet U.S. Postal Service man, seen here with one of my fellow #battgirls - Neva...


...and the second for our wonderful UPS man.  


So grab your scraps of batting and give your hand a try at making several of these bags.  It really is a quick project and sure to bring a smile to your family and friends (or even your Postman/woman!).

Wishing you and yours a Happy Easter!


Friday, December 28, 2012

Hopes & Dreams Quilt Challenge for ALS


Every day is Christmas here at Quilters Dream Batting because every day Fed Ex, UPS and our postal carriers bring in packages that pile up in the office, blocking doors, and creating a wonderful labyrinth of gifts!  It is so exciting – just imagine, Christmas every day, with gifts of quilts arriving from all over for ALS patients through Quilters Dream’s Hopes & Dreams Quilt Challenge for ALS.

We love Mark! He brings the best goodies!


What makes Neva smile? Bright & cheery florals.
We are in the fifth year of Hopes & Dreams, and, once again, we have been made aware that quilters are the most thoughtful, generous, and loving people around.  As Jennifer opens each box, it is a new surprise of colors and wonder.  Even though these quilts will not end up on our own beds, we rejoice in the unpacking, admiring, and coveting of these beautiful quilts that have been lovingly made for ALS patients and ALS research.  Although all the quilts are appreciated, each of us in the office is drawn toward a different style.   Kathy’s favorites are always the batiks and the hand-stitched lovelies.  Gina, our beachcomber, enjoys the peaches and teals of sea-themed quilts.  The pastels are Pat’s favorites, who feels the soft feminine teals, pinks, and blues are warm and calming.  Neva, an avid gardener, is immediately drawn to the bright and cheery florals.  Personally, I like the funky modern piecing designs and unique machine quilted patterns that accent them. 
 Jennifer, our photographer, is fortunate to be able to see each and every quilt unfolded, and enjoys posting the pictures on Facebook for an admiring audience of over 5,000 fans!
 
Look at all these jewels we get to open!!!!
 
 
Every day is Christmas at Quilters Dream because every day we are reminded of how blessed we are to be a part of the caring, generous community of quilters who have made Hopes & Dreams a success.


For more information about the Hopes & Dreams Quilt Challenge for ALS, click the link below.
http://quiltersdreambatting.com/HD/ALS.htm


Happy Quilting!

 ~The Dream Team


Tuesday, September 4, 2012

You can count on us...


Scrap batting made into a flower.
We hope everyone had a fabulous relaxing summer and stayed cool! Now that the kiddies are back in school and the holidays are just around the corner ( Uggg so soon right?) we are certain you are going to be busy bees quilting and crafting away. Keep in mind we are always here to help you with your batting questions and needs. Please call us for samples of our batting to try! We will be more than happy to send you some and a user’s guide to go along with it. We will also be glad to help you with goodies (mini samples) to put in gift bags for grand openings, guild meetings or shop hops! Give us a shout and we’ll help ya out!


Mini Samples

Thank you for your support.We truly appreciate it!

Quilters Dream Batting
888.268.8664
quiltersdreambatting@juno.com


Happy Quilting!
 ~The Dream Team


Follow on Bloglovin

Monday, July 2, 2012

Floating the Top


I do not have a long arm machine, so floating a quilt top does not pertain to me, but some information is just too good not to share.  Briefly, to “float the top” means to not pin it to the leaders.  To float a top, attach the backing as usual, then lay the batting on the backing and baste it to the backing to give a straight line.  Pin the top to the batting, smooth out the top, and allow the bottom to float (hang) free.  You can now lift it to smooth out the batting.  Quilt as usual, smoothing it as you go and making sure the edges stay parallel and at the same width as you started.  


Here is some advice from Kris Bizzarri:


           “I pin the backing onto the take-up roller and the canvas for the backing under the frame table.  I roll it up evenly.
            I lay the batting on top of the backing, right along the top edge – I don’t see any reason to start down 2-3”.  I place a pin about every 9” or so along the top, perpendicular to the canvas, making sure it is smoothed out.
            I baste the batting to the backing – I start on the left side, about 2” down from the batting edge.  I turn on the channel lock, turn up my speed to 30, and run a stitch along the backing/batting.  I push the machine with my left hand, rather quickly so the stitches are very large.  With my right hand, I’m pressing down on the batting just ahead of the machine so no pleats occur.  This basting line gives me a straight line to now pin my top on.
            I also figured out what to do with the canvas leader underneath that I used to pin the top to – I tied the end up to the under part of the frame, so I have a “cradle” for me to put the batting and top into as I’m working, and they’re not just laying on the floor.
            I first tried floating about 8 months ago, and haven’t done it the “old” way since.  I love it – It’s so easy to lift the top when necessary, and much easier for me to keep the top straight.”


If you have any pictures of your personal experience with “Floating the top” please share them with us.  

           
Happy Quilting!
 ~The Dream Team

 
Follow on Bloglovin