Showing posts with label Dream Fusion. Show all posts

Tuesday, February 3, 2015

Thursday, February 20, 2014

How to make a zippered pouch.


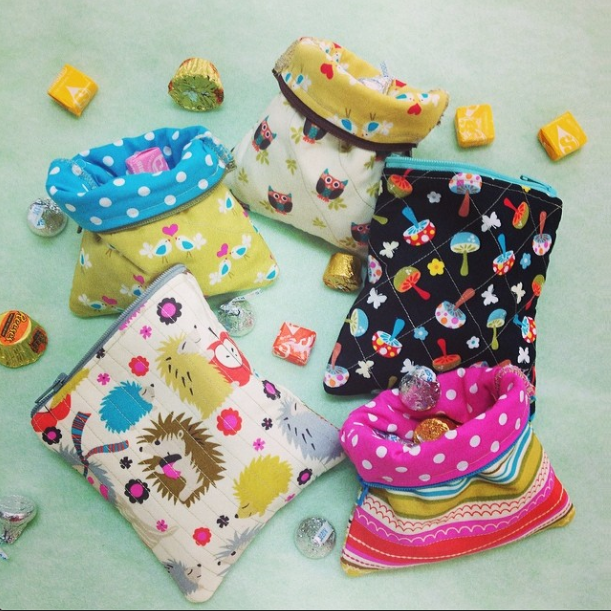
We absolutely love the zippered pouches that Jennifer made for each of us! 


In fact, we love them so much, we want to share - Jennifer has made a zippered pouch that we are giving away, with added Dream Fusion Batting that you can use for your own fun projects!


****CONTEST IS NOW CLOSED*****

Yes, it is that easy!!!
Just post your comment at the end of this blog to be entered to win!


If you aren't a winner, no worries - Jennifer wrote out instructions, so here is how you can make these adorable pouches of your own:

Supplies:


  • Coordinating Fabrics - You will cut two (2) - 5.5” x 5.5” pieces from each fabric
  • Quilters Dream Fusion - You will cut two (2) pieces - 5.5” x 5.5”
  • Zipper – 8” or longer (zipper will be cut down)
  • Thread
  • Pins
  • Scissors
  • Sewing Machine
Place your Quilters Dream Fusion batting right side up on your ironing surface and your outer pouch fabric right side up on top of the Dream Fusion Batting.
We mark the fusible side with a sticker, but if you have a scrap piece without a sticker, place the piece of Dream Fusion under a light and you will be able to see the fusible needled punched fibers as they will shine under the light.
Iron the fabric and batting to fuse them together. (Don't you love this cute little iron!!!)  It is suggested to use a steam iron on the fabric setting you are using, but as you can see, I used my mini iron and it fused nicely.
You now have two outer pieces of fabric fused to Dream Fusion batting and two pieces of coordinating lining fabric for your pouch.
Take your zipper and place it right side down on the top edge of your outer fabric.  Pin to your liking.
Take your lining fabric and place it right side down on top of your zipper, lining up the edges with your outer fabric piece.
Pin to your liking.   The zipper will be sandwiched in between the fabric.
You will now sew the three layers together, sewing as close to the zipper teeth (or chain) as possible.
Depending on your sewing machine the seam will be a little larger than a quarter of an inch.
Flip your fabrics so that your outer fabric and lining fabric join wrong sides together and pin to your liking.  Sew a 1/8th inch seam to secure your fabrics to the zipper.
This is what the lining fabric will look like after you flip it and pin.
Sew the 1/8th inch seam.
Here is what it will look like after you have sewed.
You will repeat these steps for the second side of the pouch and zipper.  Place the outer fabric face up and align the zipper face down to the top edge.
Pin the zipper to your liking and then place the lining fabric face down and pin again.
Sew the three layers together as close to the zipper teeth (or chain) as you can.
You will have a seam that is slightly larger than a quarter of an inch.
Again, you will flip the outer fabric and lining fabric so that wrong sides are together, pin to your liking, and sew a 1/8th inch seam to anchor the fabric to your zipper. 
Sewing the 1/8th seam also gives the top of the pouch a clean, finished look.
You are getting close to being finished now!  This next step you don’t want to miss because if you do – you will have a lot of “unsewing” to do and you don’t want that.  Take your zipper and open it up half way.
You will be folding the fabric so that the two outer fabric pieces are facing right sides together.  This will leave your lining fabric facing right side up – on both sides of the zipper.  Pin the three sides to your liking, trying to match up the side and bottom seams as close as possible.
Sew a ¼” seam around the three sides.  I actually started at the top where the zipper is and backstitched several times to secure the zipper.  I also sewed the ¼” seam twice just to give the pouch some additional stitch security.  After you have sewn the three sides together, you will cut the excess zipper pieces on both sides off.
I wanted to take one additional step to secure the seams, so I trimmed to 1/8” inch and then sewed a zig zag stitch around the three sides.
This seam will show inside the pouch.  By sewing the zig zag stitch it gives a clean line to the finished piece
Now you can open up the zipper and turn the pouch inside out.


Iron your little pouch to flatten out the seams and any wrinkles in the fabric.

And VOILA!  Your new little pouch is ready to be used.  You can get real creative and make quilted blocks and use those for your outer fabric, or take a page of an old telephone book or newsprint and cut to the size you like and string piece your outer fabric.  Let your imagination have fun and make multiples for your sewing bee, guild, family and friends.


Follow on Bloglovin

Batting University (Part 4) Dream Puff, Dream Wool, and Dream Fusion Batting


This week we are delighted to continue Batting University with a look at Quilters Dream Puff, Quilters Dream Wool, and Quilters Dream Fusion batting! We hope you enjoy a closer look at what makes each batting unique. If you have any questions or you would like free samples, call us toll free, 1-888-268-8664, or email: QuiltersDreamBatting@juno.com


QUILTERS DREAM PUFF BATTING
Dream Puff is 100% polyester batting that has been thermally bonded for a wonderful loft and warmth.  It is lightweight and breathable, but has a high thermal value making it even warmer than down.   


Advantages:
  • 1/3-1/2” of loft to show off your quilting, designs “pop” out at you!
  • Very warm, yet light weight.  (For even more warmth and weightiness, double the Puff or layer the Puff on top of the Dream Cotton or Dream Poly – WOW does it ever make a warm and absolutely gorgeous quilt!)
  • Cozy and cuddly – children and teens especially love this batting
  • Loft is excellent for T-shirt quilts or quilts made with varying material types
  • Loft can hide some of the imperfections in piecing
  • Can be stitched closely and holds the drape, then pops out in less quilted areas for a faux trapunto look.
  • Although it is lofty, it flattens out for ease in hand quilting!
  • Does not absorb moisture, so it dries very quickly and will not hold a stain
  • Inexpensive
  • Breathable – there are no scrims or other barriers that would inhibit airflow
  • Very long fibers – no lint on the machine or in the air!
  • Fine denier bonded microfibers bend when in contact with fabric, so they resist bearding
 
 
Disadvantages:
  • Thermally bonded, so it can become stiff it put into contact with heat (Even on low heat, the drum of some dryers become hot enough to cause a problem), so we recommend air drying or drying with no heat. Absolutely no ironing!
  • Does not wick moisture away from the body (like cotton)
  • On occasion, holds a slight crease over time (can be fluffed out in the dryer on cool setting, though!)
  • Is a man made fiber


QUILTERS DREAM WOOL BATTING  
Dream Wool is another warm and lofty batting that has been thermally bonded- it is one of my favorites for cozy snuggling on cold nights!  The U.S. wool is scoured and super-washed for cleanliness and to eliminate shrinkage, then blended with low melt poly fibers for thermal bonding.  Our unique processing creates wool batting that is light weight, machine washable, has very little shrinkage, and resists bearding.


Advantages: 
  • 1/3-1/2” of loft to show off your quilting, designs “pop” out at you!
  • Uses the soft and silky wool of U.S. raised merino and domestic sheep
  • Very warm, yet light weight.
  • Wool wicks moisture away from the body to keep you cool in the summer
  • Cozy and cuddly – children and teens especially love this batting
  • Loft is excellent for T-shirt quilts or quilts made with varying material types
  • Loft can hide some of the imperfections in piecing
  • Can be stitched closely and holds the drape, then pops out in less quilted areas for a faux trapunto look.
  • Although it is lofty, it flattens out for ease in hand quilting! (Dream Wool is the favorite of many hand quilters!)
  • Does not absorb moisture, so it dries very quickly and will not hold a stain
  • Breathable – there are no scrims or other barriers that would inhibit airflow
  • Bonded fibers resist bearding
  • Very long fibers – no lint on the machine or in the air!
 
 
Disadvantages:
  • Thermally bonded, so it can become stiff it put into contact with heat (Even on low heat, the drum of some dryers become hot enough to cause a problem), so we recommend air drying or drying with no heat. Absolutely no ironing!

  • Occasionally holds a slight crease over time (can be fluffed out in the dryer on cool setting, though!)
  • Wool fibers used, but also includes a man made poly fiber, so it is not flame retardant

 QUILTERS DREAM FUSION  
 
With Quilters Dream Fusion, enjoy the wonderful quality and consistency of Quilters Dream Cotton and Quilters Dream Poly with the convenience of a one sided fusible. Unlike most fusibles, Dream Fusion does not become stiff and sticky when used - it stays soft, supple, and drapeable so it is great for jackets and other clothing, bags, quilt-as-you go, embroidery, etc. (Jennifer insists I let you know that this is her favorite batting - she fuses the backing to the batting, then she can quilt with her domestic machine without worrying about pleating or puckering "back there".)
 
Advantages:
  • One sided fusible ads stability and ease for use in small projects
  • Uses a fusible webbing (rather than glue) that is needlepunched into the cotton or poly fibers so it does not become stiff
  • Can machine quilt or embroider at high speed without gumming the needle
  • Is soft, smooth, and consistent - just like our Dream Cotton and Dream Poly, but with an added soft fusible web
  • Available in both cotton and poly, so gives more options (see cotton and poly advantages)
Disadvantages:
  • Because the webbing is needlepunched into the batting (not sprayed on as a glue), it is only available on one side
  • Is not a 100% natural batting since it does incorporate the fusible webbing
  • Can be difficult to tell which side is fusible - so pay close attention to the sticker!


All of our battings are proudly made in the USA, and each batting is hand cut and hand inspected to insure superb quality is consistency.  Quilters Dream is a small, family owned business, so we don’t sell to chain stores and always encourage our customers to support their locally owned quilt shop or quilting business!  There are a lot of advantages to using Quilters Dream Batting, and with the wide variety of lofts, fibers, colors & sizes available, we hope that you find the choices to be to your advantage when choosing the perfect type of batting for your quilted treasure!
Please come back soon for a bonus Sweet Dreams Cotton Stuffing blog we are adding to Batting University! (OK, so I know stuffing isn't batting, but it is really cool stuff!)

Happy Quilting!

Follow on Bloglovin

Tuesday, November 12, 2013

How to make a quilted tissue pouch

So Jennifer here is a non stop machine! She just came back from market and made this tutorial on a fun project using Quilters Dream Fusion. The holidays are literally right around the corner and this would be sooooo cute for a stocking stuffer or last minute gift idea!
Supplies you will need:
  • Two (2) pieces of 6” x 8” Coordinating Fabric
  • One (1) piece of 6” x 8” Dream Fusion batting (available in Cotton or Poly)
  • Scissors
  • Thread
  • Pins
  • Sewing Machine
  • Iron


Directions:

Place the 6” x 8” piece of Dream Fusion on your ironing board with the fusible side up (we mark the fusible side with a sticker, but you can also tell as the fusible side has a little more texture to it and a shine you can see under a light).


Place one piece of your 6” X 8” piece of fabric wrong side down – so that the backside of your fabric is touching the fusible side of the batting.


This fabric is cotton, so we used the cotton steam setting and then ironed, holding the iron down for a few seconds in all directions while ironing.  If you are using the Poly Select Dream Fusion, you can create this same steam effect by placing a piece of moist muslin on top and using the iron on a lower setting. 
**Helpful Tip**- Using the steam and having the fabric on top of the fusible side of the batting produces the best contact when bonding.  If you want to ensure your iron does not come in contact with the fusible batting, place an applique sheet or piece of parchment paper over the fabric before ironing.

Once the batting and fabric are fused, place your second 6” x 8” piece of fabric right side down on top of the piece of fabric you just fused to the batting.


Pin to your liking.  You will sew a quarter-inch (¼) seam on both short sides of the fabric (on the 6” sides). 

Press the sewn sides to seal the stitches and then turn the fabric inside out so that the right sides of the fabric are facing out. 


  Once you have turned the piece inside out, press the short sides again.


It will look like this when finished.
Now you have a choice. You can keep this the way it is or you can use this as a way to practice your free motion quilting or simply stitch straight lines until the whole piece is quilted.


Once quilted, determine which piece of fabric will be the outside of the tissue holder/handy pouch and have it facing right side up. 


Take both short sides (6” sides) and turn them upwards and meet in the middle of the fabric.  Pin the raw ends to your liking.  Sew the raw ends together using a quarter-inch (¼) seam.  Press to secure stitches.
Clip the corner tips and turn the pouch inside out.  Press seams and you’re done!!!


Use this to hold the little individual packages of tissues or post-it notes or whatever you like.  You can also turn this into a thread catcher to keep beside your sewing machine.