Showing posts with label batting projects. Show all posts

Thursday, April 17, 2014

How to make an Easter treat bag

Do you have lots of batting scraps left over from your quilting projects and don't want to throw them away, yet don't know what to do with them?


While looking through the many Easter projects posted on Pinterest, I saw this cute bunny bag made of felt.

Bunny Bag by Merrilee - @mer-mag on Instagram


Immediately I thought of all the scraps I have of Quilters Dream Fusion Natural Cotton Select and decided to give it a try.


Dream Fusion is my favorite batting because I tend to do small projects, including quilts, on my domestic Singer sewing machine.


The Dream Fusion allows me to secure the batting to my backing material and simply pin the four corners of my quilting projects and quilt away without having to worry about any pleating or puckering of my backing. You do not need to spray baste or thread baste your quilt top to your batting/backing material once the Dream Fusion is secured to your backing material.  [If you like paper piecing, Dream Fusion is wonderful for securing the seams of your finished pieced quilt top!]

For this project I found a sweet spring print and fused the batting and cotton fabric.  The fabric will actually be the inside of the bag and the batting will be the outside of the bag.  [If you have scraps of the Quilters Dream Cotton Select, Deluxe or Supreme loft you can make these bags without of fabric lining!]


To fuse - use the Cotton STEAM setting on your iron, place the Dream Fusion on the ironing board with the fusible side up and then place your fabric right side up on top of the batting.  Steam is your friend.  Take your time and slowly iron the two pieces together.  Once your piece cools the Dream Fusion is secure to the fabric.  


Next - make your template.


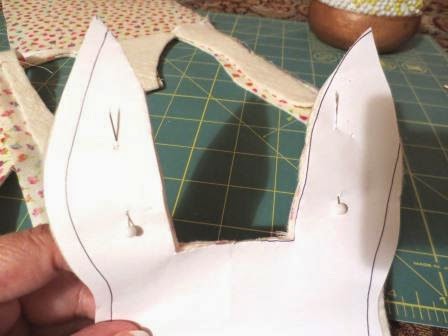
I took a half of a sheet of regular typing paper and freehand the outline of the face of a bunny.  Yes, the first time I drew the outline I realized the space between the bunny ears (which will not be sewn) was not going to be wide enough to place any candy in the bag when finished, thus the additional lines.


To ensure both sides were equal, I folded the paper in half and cut.  I did remember to cut a 1/4" seam allowance around the the outline for sewing purposes.


When I opened up the paper template it looked much better.


Because I had a long, narrow piece of fused batting I decided to fold it in half and save myself from having to sew a bottom seam.  


I placed the bottom of the paper template to the folded edge of the batting, pinned the template in place and cut.

Looks good, except I wanted it a little wider at the opening between the ears.  


No problem - just trim the template and batting from the inside of the two ears.


Much better!

Remove the pins and paper template and open up your fused fabric piece.  


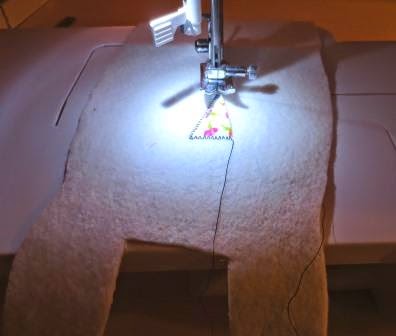
Take a piece of your scrap fused fabric and cut out a triangle.  With a zigzag or decorative stitch sew the triangle piece of fabric on the batting side as a nose for your bunny's face.  You will also want to stitch a solid line about 3/4" of an inch from the bottom point of the nose to act as the mouth.  If your machine has a decorative stitch that looks like a filled in circle, use that to sew two eyes just above the fabric nose or add buttons for eyes.


You are almost done!  Fold the piece in half with the batting facing right sides together.  This will mean your fabric is on the outside.


Start at the inside edge of one of the bunny ears and sew all the way around the template.  You will want to back stitch your first few stitches and your last few stitched to secure your sewing.  While I had folded the fabric at the bottom and didn't need to stitch, I was on a roll and just kept sewing until I reached the inside edge of the second ear.


You will leave the space between the ears open.  Now, turn the bunny bag right side or batting side out.


Give the bag one more good steam press with the iron.


Fill with candy.


Take a strip of your fabric or some ribbon and tie a bow at the top and voila!  A fun Easter gift to share with others.


I made two, one for our sweet U.S. Postal Service man, seen here with one of my fellow #battgirls - Neva...


...and the second for our wonderful UPS man.  


So grab your scraps of batting and give your hand a try at making several of these bags.  It really is a quick project and sure to bring a smile to your family and friends (or even your Postman/woman!).

Wishing you and yours a Happy Easter!


Tuesday, April 1, 2014

Featured #battgirls (April2014) - Doodlemoochie Quilt & Design Studio


 We are very excited about our new blog series! We've been emailed fun and creative submissions from you #battgirls and can't wait to see what you other busy bees have been up! To get yourself caught up on all the excitement, check out our previous post.  But hurry back because we want you to meet our first featured #battgirls!


*****************************************************************************


Right: Becky Everett (the Moochie)
Left: Becky's daughter (Doodle)


Meet Becky Everett, the CEO of  Doodlemoochie Quilt & Design Studio! We have had the pleasuring of knowing Becky for some quite some time. She has been a dedicated Quilters Dream customer for years and LOVES quilting on her Gammill. It was through her Instagram account- @doodlemoochie, where we really got to see her talent. We are always SO eager to see her new masterpiece when we get notifications on our phones that Becky has tagged us- @quiltersdream in her photos!! Take a look for yourself... :)


This cheerful bright gem on the left won the "Professionally Quilted" category on the Quilt Bloggers Quilt Festival last Spring. In her blog, Becky refers to this quilt as a "30's quilt with a Modern twist."

*For more on this quilt- visit her blog post.


Or how about this fun wall hanging she quilted up? Her unique color choice and detailed definition truly shows off her creativity and talent!! She used the free Star Bright Quilt Pattern from Swim Bike Quilt.

*Check out her Star Bright blog post


So are you ready to hear the secret of how Becky achieves the look on her quilts like this stunning eye-catcher?? Start by snagging the Kiara Chevron Pattern  on Craftsy and head to your local quilt shop for some Quilters Dream Batting!

*See the process in creating this pattern.


Becky's Technique: 

Use a double layer of batting. Pick a batting that is thinner, like Dream Cotton or Dream Blend. Then pair that with one that has some loft, like the Dream Puff or Dream Wool. When doing this technique, your quilt will have a nice added weight to it as well as giving it that 3 dimensional pop to your stitching! 


Check out more from Doodlemoochie:

Instagram: @doodlemoochie


*********************************************************************************

Well, there you have it #battgirls! Spreading the love, creativity and inspiration! Want to try the technique like Doodlemoochie? Call us for free samples and we'll help you get the ball rolling! So get your cameras ready and send in your projects. The search for future #battgirls shall continue. 


Looking forward to your submissions :)
~The Original 


Follow on Bloglovin

Thursday, February 20, 2014

How to make a zippered pouch.


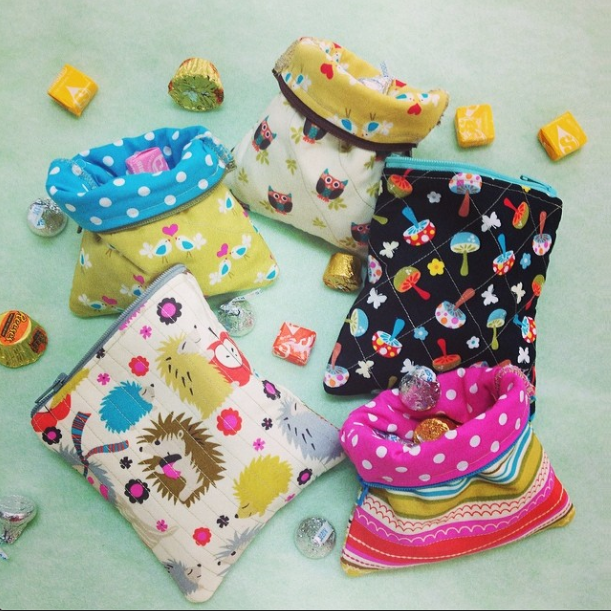
We absolutely love the zippered pouches that Jennifer made for each of us! 


In fact, we love them so much, we want to share - Jennifer has made a zippered pouch that we are giving away, with added Dream Fusion Batting that you can use for your own fun projects!


****CONTEST IS NOW CLOSED*****

Yes, it is that easy!!!
Just post your comment at the end of this blog to be entered to win!


If you aren't a winner, no worries - Jennifer wrote out instructions, so here is how you can make these adorable pouches of your own:

Supplies:


  • Coordinating Fabrics - You will cut two (2) - 5.5” x 5.5” pieces from each fabric
  • Quilters Dream Fusion - You will cut two (2) pieces - 5.5” x 5.5”
  • Zipper – 8” or longer (zipper will be cut down)
  • Thread
  • Pins
  • Scissors
  • Sewing Machine
Place your Quilters Dream Fusion batting right side up on your ironing surface and your outer pouch fabric right side up on top of the Dream Fusion Batting.
We mark the fusible side with a sticker, but if you have a scrap piece without a sticker, place the piece of Dream Fusion under a light and you will be able to see the fusible needled punched fibers as they will shine under the light.
Iron the fabric and batting to fuse them together. (Don't you love this cute little iron!!!)  It is suggested to use a steam iron on the fabric setting you are using, but as you can see, I used my mini iron and it fused nicely.
You now have two outer pieces of fabric fused to Dream Fusion batting and two pieces of coordinating lining fabric for your pouch.
Take your zipper and place it right side down on the top edge of your outer fabric.  Pin to your liking.
Take your lining fabric and place it right side down on top of your zipper, lining up the edges with your outer fabric piece.
Pin to your liking.   The zipper will be sandwiched in between the fabric.
You will now sew the three layers together, sewing as close to the zipper teeth (or chain) as possible.
Depending on your sewing machine the seam will be a little larger than a quarter of an inch.
Flip your fabrics so that your outer fabric and lining fabric join wrong sides together and pin to your liking.  Sew a 1/8th inch seam to secure your fabrics to the zipper.
This is what the lining fabric will look like after you flip it and pin.
Sew the 1/8th inch seam.
Here is what it will look like after you have sewed.
You will repeat these steps for the second side of the pouch and zipper.  Place the outer fabric face up and align the zipper face down to the top edge.
Pin the zipper to your liking and then place the lining fabric face down and pin again.
Sew the three layers together as close to the zipper teeth (or chain) as you can.
You will have a seam that is slightly larger than a quarter of an inch.
Again, you will flip the outer fabric and lining fabric so that wrong sides are together, pin to your liking, and sew a 1/8th inch seam to anchor the fabric to your zipper. 
Sewing the 1/8th seam also gives the top of the pouch a clean, finished look.
You are getting close to being finished now!  This next step you don’t want to miss because if you do – you will have a lot of “unsewing” to do and you don’t want that.  Take your zipper and open it up half way.
You will be folding the fabric so that the two outer fabric pieces are facing right sides together.  This will leave your lining fabric facing right side up – on both sides of the zipper.  Pin the three sides to your liking, trying to match up the side and bottom seams as close as possible.
Sew a ¼” seam around the three sides.  I actually started at the top where the zipper is and backstitched several times to secure the zipper.  I also sewed the ¼” seam twice just to give the pouch some additional stitch security.  After you have sewn the three sides together, you will cut the excess zipper pieces on both sides off.
I wanted to take one additional step to secure the seams, so I trimmed to 1/8” inch and then sewed a zig zag stitch around the three sides.
This seam will show inside the pouch.  By sewing the zig zag stitch it gives a clean line to the finished piece
Now you can open up the zipper and turn the pouch inside out.


Iron your little pouch to flatten out the seams and any wrinkles in the fabric.

And VOILA!  Your new little pouch is ready to be used.  You can get real creative and make quilted blocks and use those for your outer fabric, or take a page of an old telephone book or newsprint and cut to the size you like and string piece your outer fabric.  Let your imagination have fun and make multiples for your sewing bee, guild, family and friends.


Follow on Bloglovin